OpenStackメッセージング機構を探ってみる(4) 〜Call(情報照会)編〜
前回につづいて、OpenStackメッセージング機構を探ってみる。
◆前回までのおさらい
OpenStackメッセージング機構を体感するために、以下の例題を解決する実現モデルを考えてみる。
1. 例題
実験環境は、サーバ装置1台と、クライアント装置2台で構成されている。
ある特定のクライアント装置が、サーバ装置のマシン時刻を知りたい場合、どうような解決方法が存在するのだろうか?
2. 実現モデル
ここでは、OpenStackメッセージング機構の理解を目的とするので、実現モデルの優位性とかは問題視しません。
案1)同報通知モデル「定期的に、サーバ装置が、全クライアント装置に、同報的に通知する」
案2)特定通知モデル「定期的に、サーバ装置が、特定のクライアント装置に、通知する。」
案3)情報照会モデル「特定のクライアント装置が、サーバ装置にマシン時刻を問い合わせる」
前回までに、案1と案2での実現レベルを確認した。
OpenStackメッセージング機構を探ってみる(2) 〜fanout(同報通知)編〜 - SDN開発エンジニアを目指した活動ブログ
OpenStackメッセージング機構を探ってみる(3) 〜Cast(特定通知)編〜 - SDN開発エンジニアを目指した活動ブログ
◆案3「情報照会モデル」の事前調査
前回と同様に、OpenStackメッセージング概要を理解するために、OpenStack Developerページを確認してみた。
AMQP and Nova — nova 2014.2.dev38.ga8b2eaa documentation
以下は、同サイトからの引用。
RPC Calls
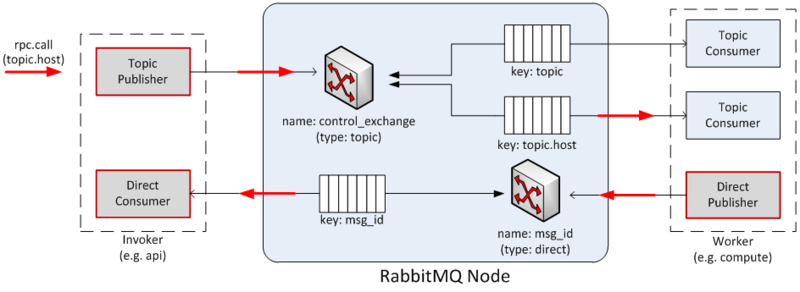
The diagram below shows the message flow during an rpc.call operation:1. a Topic Publisher is instantiated to send the message request to the queuing system; immediately before the publishing operation, a Direct Consumer is instantiated to wait for the response message.
2. once the message is dispatched by the exchange, it is fetched by the Topic Consumer dictated by the routing key (such as ‘topic.host’) and passed to the Worker in charge of the task.
3. once the task is completed, a Direct Publisher is allocated to send the response message to the queuing system.
4. once the message is dispatched by the exchange, it is fetched by the Direct Consumer dictated by the routing key (such as ‘msg_id’) and passed to the Invoker.

RPC Callは、前回までのFanout, castと違って、ちょっと複雑な内部構造になっている。
しかしながら、OpenStack側での共通ライブラリ(という表現が適切か否かは不明だが...)では、まったく内部構造を意識することなく、RPCプログラミングが実現できてしまう点が、Awesome!!
OpenStackメッセージング機構でのRPC Callの理解が深まったところで、さっそく、サンプルコードで試してみる。
◆案3「情報照会モデル」を試してみた
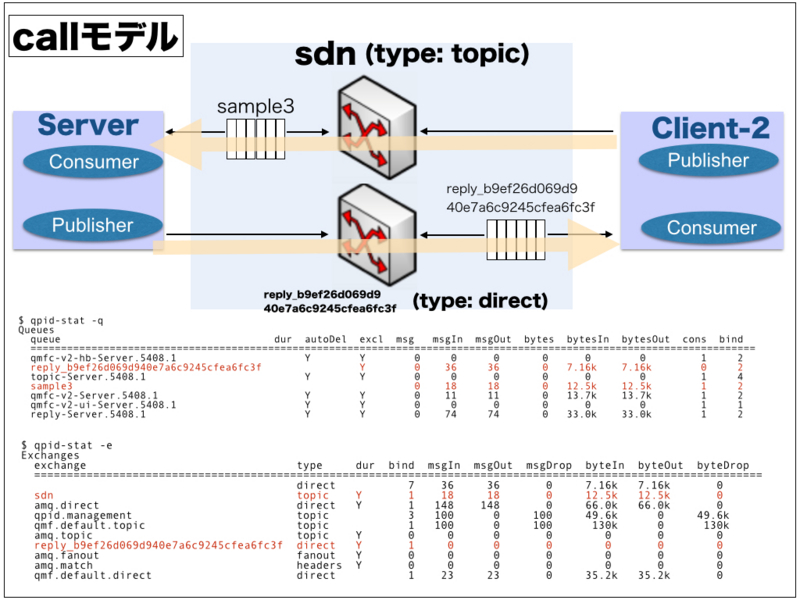
このモデルでは、callというメソッドが用意されている。
サーバ側サンプルコード"receive_call.py"
サーバ側の設定ファイル"server.conf"は、前回と同様のものを使用する。
import os
import datetime
import time
import logging
import eventlet
eventlet.monkey_patch()

from openstack.common import context
from openstack.common import rpc
from openstack.common.rpc import proxy
from openstack.common.rpc import dispatcher
from oslo.config import cfg

logging.basicConfig()
logging.getLogger('qpid').setLevel(logging.INFO)
logging.getLogger('amqp').setLevel(logging.INFO)
logging.getLogger('openstack.common').setLevel(logging.INFO)
LOG = logging.getLogger(__name__)
LOG.setLevel(logging.DEBUG)

CONF = cfg.CONF
CONF(default_config_files=['server.conf'])

rpc.set_defaults(control_exchange='sdn')
topic = "sample3"
my_host = os.uname()[1]

class Server(object):

    def __init__(self):
        self.dispatcher = dispatcher.RpcDispatcher([self])
        self.conn = rpc.create_connection(new=True)
        self.conn.create_consumer(topic, self.dispatcher)
        self.conn.consume_in_thread()

    def func_call(self, context, **kwargs):
        LOG.debug('received call_request [ hostname=%s, getdate=%s ]'
            %(kwargs["hostname"],kwargs["getdate"]))
        return my_host, datetime.datetime.today()


if __name__ == '__main__':
    Server()

    while True:
        time.sleep(1)
クライアント側サンプルコード"send_call.py"
クライアント側の設定ファイル"client.conf"は、前回と同様のものを使用する。
import os
import datetime
import time
import logging
import eventlet
eventlet.monkey_patch()

from openstack.common import context
from openstack.common import rpc
from openstack.common.rpc import proxy
from openstack.common.rpc import dispatcher
from oslo.config import cfg

logging.basicConfig()
logging.getLogger('qpid').setLevel(logging.INFO)
logging.getLogger('amqp').setLevel(logging.INFO)
logging.getLogger('openstack.common').setLevel(logging.INFO)
LOG = logging.getLogger(__name__)
LOG.setLevel(logging.DEBUG)

CONF = cfg.CONF
CONF(default_config_files=['client.conf'])

rpc.set_defaults(control_exchange='sdn')
topic = "sample3"
my_host = os.uname()[1]

class Client(proxy.RpcProxy):
    OPTS = []
    BASE_RPC_API_VERSION = '1.0'

    def __init__(self):
        self.context = context.get_admin_context()
        super(Client, self).__init__(
            topic=topic,
            default_version=self.BASE_RPC_API_VERSION)
        eventlet.spawn(self._periodic_call)

    def _periodic_call(self):
        while True:
            time.sleep(1)
            (hostname, getdate) = self.func_call()
            LOG.debug('received call_reply [ hostname=%s, nowtime=%s ]'
            %(hostname, getdate))

    def func_call(self):
        method = "func_call"
        self.getdate = 'now'
        return self.call(
            self.context,
            self.make_msg(
                method,
                hostname=my_host, getdate=self.getdate
            ),
            topic=self.topic)


if __name__ == '__main__':
    Client()

    while True:
        time.sleep(1)
実行結果
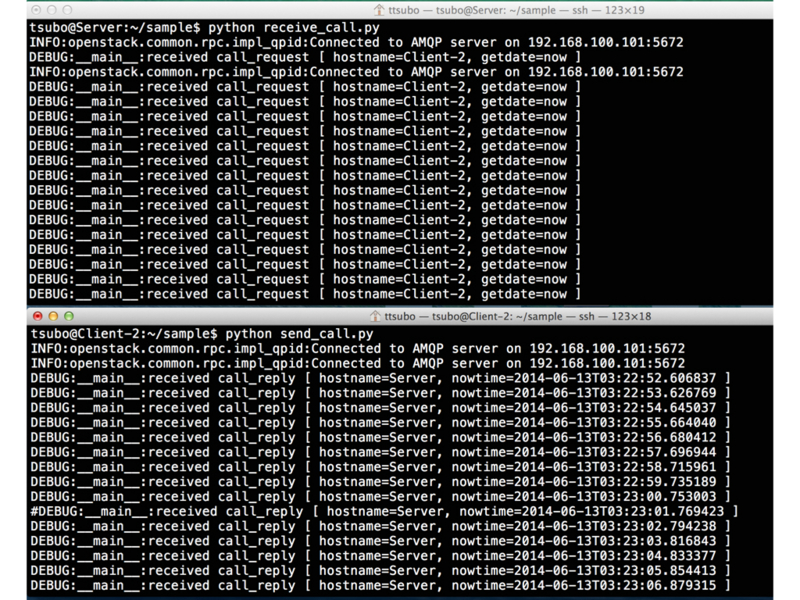
サンプルプログラムの実行結果は、こんな感じ。(上段がサーバ装置、下段がクライアント装置)
クライアント装置からサーバ装置のマシン時刻の問い合わせを行うたびに、情報照会されている様子が確認できた。

◆おまけ編
これまで、OpenStackメッセージング実験環境は、Apache Qpidで確認してきた。
折角なので、rabbit-mqでも動作を試してみたい。
qpidの停止
# service qpidd stop
rabbit-mqインストール
# apt-get install rabbitmq-server
クライアント側の設定ファイル"server.conf"
[DEFAULT]
rabbit_host= 192.168.100.101
rpc_backend = openstack.common.rpc.impl_kombu
#qpid_hostname = 192.168.100.101
#rpc_backend = openstack.common.rpc.impl_qpid
クライアント側の設定ファイル"client.conf"
[DEFAULT]
rabbit_host= 192.168.100.101
rpc_backend = openstack.common.rpc.impl_kombu
#qpid_hostname = 192.168.100.101
#rpc_backend = openstack.common.rpc.impl_qpid
実行結果
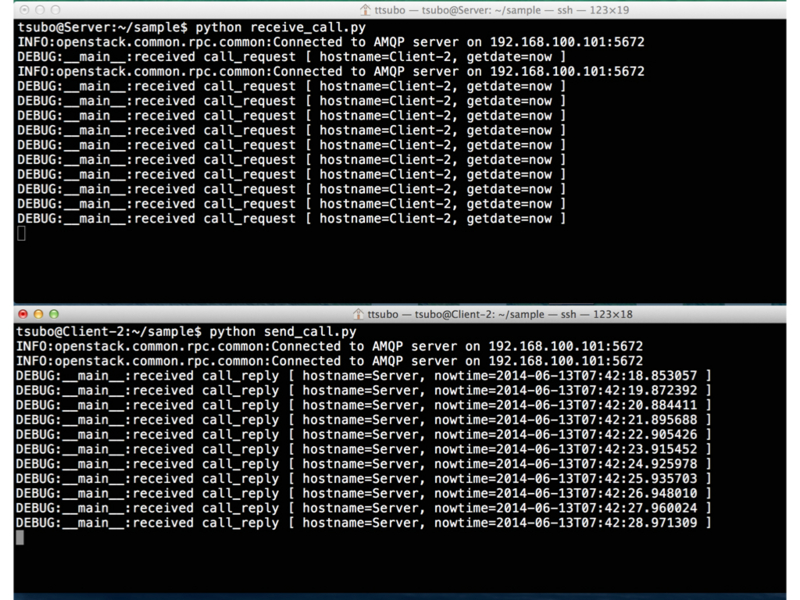
サンプルプログラムの実行結果は、こんな感じ。(上段がサーバ装置、下段がクライアント装置)
設定ファイルの記述修正のみで、"Apache Qpid"から"rabbit-mq"への切り替えが簡単に実現できてしまう点が確認できた。

RabbitMQ Web管理インターフェイス
RabbitMQには、Web管理インターフェイスなるものが存在するらしい。そこで、実際に使ってみた。
第14章 ロギングと監視 - OpenStack 運用ガイド
$ sudo /usr/lib/rabbitmq/bin/rabbitmq-plugins enable rabbitmq_management
$ sudo service rabbitmq-server restart
(1) Overview

(2) Exchanges

(3) Queues

◆おわりに
実際に、サンプルプログラムを動かしながらOpenStackメッセージング機構の動作を確認してみて、だいぶ理解が深まった。
OpenStackメッセージング機構を活用すれば、SDN用途に限らずに、一般の業務ツールなどのさまざまな局面での適用が期待できる点を、実感できた。
